How to deploy frontend apps like ReactJs, NextJs on AWS Amplify?
Deploying frontend apps should feel predictable, repeatable, and fast. This guide shows you step-by-step how to deploy React and Next.js applications on AWS Amplify, from connecting your Git repo to setting custom domains and production best practices. If you're a junior to mid frontend or full stack developer, you'll finish this tutorial knowing how to ship safely to production using AWS Amplify's hosting and CI/CD features.
What is AWS Amplify and when to use it?
AWS Amplify is a managed set of services and tools from AWS for building, deploying, and hosting modern web and mobile apps. For frontend developers it provides:
Git-connected hosting
CI/CD for static and server-rendered apps
Easy custom domain and TLS certificate management
Integration with backend features (Auth, APIs, Storage) through the Amplify framework (optional)
When to use Amplify:
You want Git-based deploys and managed hosting with minimal infra work
Your app is primarily static or server-side rendered by frameworks like Next.js
You choose AWS native tooling and expect easy integration with other AWS services
warning
When not to use Amplify: if you need very custom infra, custom server clusters, or fine-grained control over CDN behaviour beyond CloudFront defaults, consider alternatives (see the When NOT to use Amplify section).
Analogy: think of Amplify as a managed hosting bakery, it bakes and serves your app from source control without you running the oven.
Architecture overview
Typical flow when deploying with Amplify:
Developer pushes code to Git (GitHub/GitLab/Bitbucket)
Amplify detects the push via webhooks
Amplify pulls the repo, runs the build commands in a build container
Built assets are stored and served via Amplify Hosting + CloudFront distribution
High-level diagram:
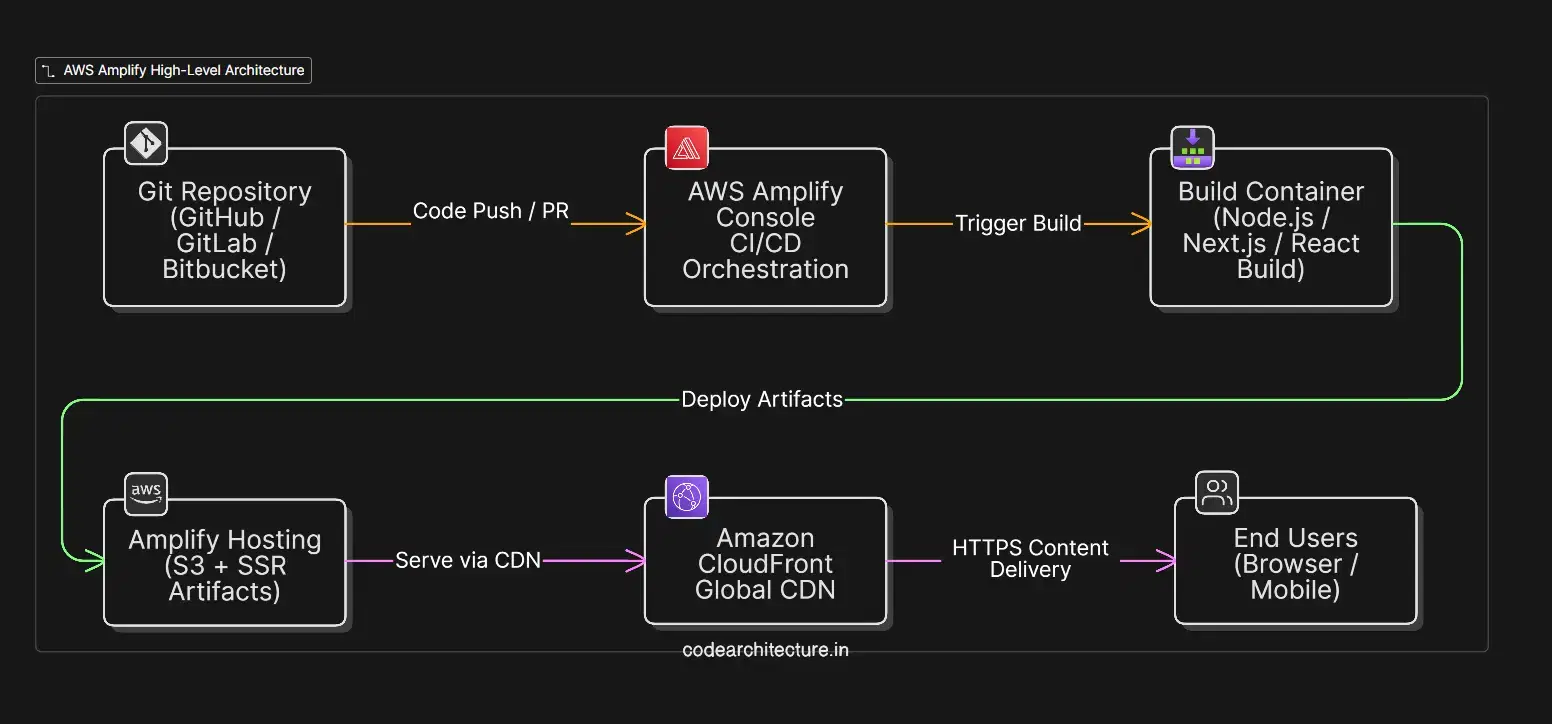
Key pieces:
Build container: runs
Hosting: stores artifacts and wires up a managed CloudFront distribution
Domain: Amplify provisions a TLS cert and integrates with Route 53 or your DNS provider
Deploying a React.js app on AWS Amplify (step-by-step)
This is the most common scenario: a create-react-app or Vite-based SPA.
Prerequisites
An AWS account with permissions to manage Amplify and Route 53 (or a DNS provider)
A GitHub/GitLab/Bitbucket repo with your React app
Steps
Sign in to the AWS Console and open the Amplify Console.
Click "Get started" under Deploy -> Host web app.
Choose your Git provider and authorize Amplify to access your repo.
Select the repository and branch to deploy.
Amplify auto-detects the framework (React). Confirm build settings or customize.
Click Save and Deploy — Amplify will run the build and publish.
Local checklist (what Amplify runs)
Install dependencies:
npm ci or yarn installBuild:
npm run build(for CRA/Vite/React)Artifacts: Amplify expects a directory to publish, usually build/ for CRA or dist/ for Vite
Tips and common pitfalls
Ensurehomepage isn't misconfigured in CRA. For root deployments, remove trailing slashes.If build fails due to memory in large monorepos, increase node memory or use smaller build steps.
Set the correct publish directory in Amplify's build settings (e.g., build/ or dist/).
Deploying a Next.js app on AWS Amplify
Amplify supports Next.js with key features like SSR, SSG, and ISR. You can deploy both static exports and server-side features. Amplify runs a build phase and can serve SSR pages via serverless functions.
SSR vs SSG vs ISR support
SSG (Static Site Generation): Amplify fully supports building static pages at build time, ideal for blogs and marketing sites.SSR (Server-Side Rendering): Amplify supports SSR by deploying server-side rendering as Lambda functions. Each SSR route becomes a serverless handler.ISR (Incremental Static Regeneration): builds specific pages on demand and updates the static cache.
| Rendering Strategy | When to Use | Benefits | Considerations |
|---|---|---|---|
| SSG (Static Site Generation) | Most public content | Very fast, cheap, CDN-friendly, great SEO | Requires rebuild to update content |
| ISR (Incremental Static Regeneration) | Mostly static pages with occasional updates | Fast like SSG, updates without full rebuild | Content may be slightly stale until revalidated |
| SSR (Server-Side Rendering) | Fresh content needed per request (e.g., personalized pages) | Always up-to-date content | Higher latency, server cost, cold start risk |
Edge functions overview
Edge functions are lightweight serverless functions that run on the CDN edge (CloudFront Lambda@Edge / CloudFront Functions). Amplify provides integrations for edge-like behaviors, but native true-edge deployments are evolving on AWS.
When to use edge functions:
| Use Case | Why Edge Functions Are Ideal |
|---|---|
| A/B Testing | Runs at CDN edge, enables instant variant selection with near-zero latency |
| Redirects | Fast routing decisions before request hits origin |
| Header Manipulation | Modify headers at the CDN level without server involvement |
| Lightweight Auth Checks | Quick token/session validation without full backend calls |
| Geolocation-Based Responses | Serve region-specific content using user location at the edge |
If you need advanced edge compute, evaluate CloudFront Functions or Lambda@Edge directly or Vercel for a more mature edge runtime for Next.js.
Build settings and amplify.yml
Amplify uses
amplify.yml for React Apps:
amplify.yml for Next Apps:
info
baseDirectory is the folder Amplify deploys. you can use build/ for CRA, out/ for Next.js static exports, and for Next.js SSR Amplify automatically publishes the required server artifacts. Enable caching (like node_modules or package manager caches) to significantly speed up build times.
Environment variables setup
Use Amplify Console to set environment variables per branch. These are injected at build time and (for serverless builds) available at runtime for SSR functions.
Best practices:
Never hardcode secrets in source control. Store them in Amplify environment variables or AWS Secrets Manager.
Use different branches for different environments (e.g.,
main -> production,staging -> staging) and configure branch-specific env vars.Prefix runtime-only variables (for client) with
NEXT_PUBLIC_ in Next.js so they are exposed correctly.
How to add variables in Amplify Console:
Open your app in Amplify Console.
Choose the branch and click "Environment variables".
Add key/value pairs and save. Redeploy to pick them up.
Custom domain setup (Route 53 + Amplify)
Using Route 53 is usually the easiest option because Amplify can automatically handle DNS records and SSL validation.
Steps to add a custom domain via Route 53:
Make sure your domain is already managed in Route 53.
In the Amplify Console, open Domain management and click Add domain.
Select your Route 53 domain and map branches to routes (e.g.,
www.example.com ->main branch ).Amplify will create the required DNS records and provision the SSL certificate automatically.
If your DNS is managed outside Route 53, you’ll need to manually add the CNAME or A records shown by Amplify and complete domain validation yourself.
CI/CD flow using GitHub
Amplify integrates directly with GitHub. Core flow:
Developer opens PR then Amplify creates preview build (optional)
Merge PR to branch then Amplify automatically builds and deploys the branch
Setting up GitHub Actions is optional because Amplify provides hosting + CI. However, some teams prefer running tests in GitHub Actions and only letting Amplify handle the build/publish step.
Recommended flow for teams:
Use GitHub for code review and automated tests
Let Amplify handle the build and deployment on merges
Optionally create a preview branch for each PR using Amplify Preview (enable in Console)
Quick checklist for secure CI/CD:
Protect
main branch and require PR reviewsRun tests and lint in GitHub Actions before PRs can merge
Use Amplify branch roles and least-privilege AWS IAM policies
Performance, caching, and security best practices
Performance
Prefer SSG and CDN cached responses for fastest page loads
Use
Cache-Control headers to control how CloudFront caches assets (Amplify provides defaults, but you can customize via rewrites/headers)Compress assets, use modern image formats, and enable Brotli/Gzip
Caching
Static assets: long-lived cache (immutable) + fingerprinting (e.g., content hash in filenames)
HTML pages: shorter cache TTL or use ISR to update pages on demand
Security
Use HTTPS (Amplify provisions SSL automatically)
Use HTTP security headers (CSP, HSTS, X-Frame-Options). Configure them via rewrites/headers in Amplify Console.
Store secrets in environment variables or Secrets Manager, not in code
Monitoring & Observability
Enable CloudWatch logging for SSR Lambdas if using SSR
Use real user monitoring (RUM) or synthetic tests to monitor performance
When NOT to use Amplify (limitations & alternatives)
Limitations
Less control over low-level CloudFront behavior or custom caching at extreme scale
Complex backend server workflows or long-running server processes are better served by ECS, EKS, or EC2
Very advanced edge compute may need Lambda@Edge or a provider specialized in edge runtimes
Alternatives
Netlify / Vercel: excellent for Next.js, especially edge and ISR workflows
S3 + CloudFront + CodePipeline: more control, more configuration
Container-based hosting (ECS/EKS): for apps that require custom servers or long-lived processes
Choose Amplify when you want speed-to-market, integrated hosting, and AWS-native tooling. Choose alternatives when you need extreme customization, specialized edge runtimes, or custom server infra.
Conclusion & key takeaways
Amplify gives a straightforward path to deploy React and Next.js apps with Git-based CI/CD and managed hosting.
Prefer SSG/ISR for best performance and cost. Use SSR only when necessary.
Configure
amplify.yml , environment variables, and custom domains correctly to avoid deployment surprises.Monitor builds and use caching to speed up deploys.